Happy New Year and welcome to the 2026 Tunisian Blanket CAL! I’m so glad to have you here. I can’t wait to share this blanket with you and see your projects come together throughout the year. In this post, you’ll find all the essential details, including a practice swatch to help you get started. I’ve also put together a collection of tutorials to guide you through making your first swatch.
Embroidering directly on fabric can feel a little tricky at first, so we’re beginning with a small practice swatch. This will give you the confidence and familiarity you need before working on the panels of the Neev blanket. It’s a gentle introduction to the technique and covers most of the basics you’ll use as the designs become more detailed.
CLICK HERE TO PURCHASE THE AD-FREE PATTERN!
Disclaimer: this post may contain affiliate links – please see my affiliate disclosure for details.
Introduction
Embroidery on Tunisian crochet fabric has been around for a long time. I’ve talked to many people who learned Tunisian crochet decades ago, and almost all of them told me how they embroidered over their crochet fabric. I wanted to revisit that beautiful tradition in a fresh way — and hopefully bring back some happy memories for those who’ve done it before!
If you’re new to Tunisian crochet, this is a wonderful place to start. It’s a beginner-friendly project where you’ll only need to know one stitch — the Tunisian Simple Stitch — and I’ve included detailed videos and practice material to help you along. The Tunisian crochet portion is simple and approachable even if you’ve never tried it before. The design as a whole is rated intermediate, only because of the intricate embroidery work that follows.
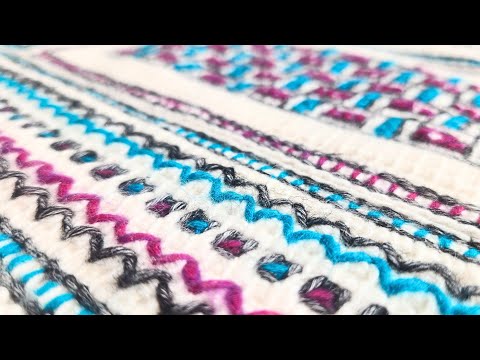
This project combines Tunisian crochet with embroidery, focusing on Blackwork-style designs that are worked over a simple crochet canvas. The dense, grid-like structure of the Tunisian Simple Stitch makes it perfect for embroidery because it stays stable and doesn’t stretch much — like working on your own handmade fabric canvas!
When I started this project, I had very little embroidery experience, so it felt like learning a whole new craft. But once I got going, it became easier and so enjoyable that I didn’t want it to end! You can create endless designs with this, and once you get comfortable, you can even use traditional Blackwork patterns for your own projects.
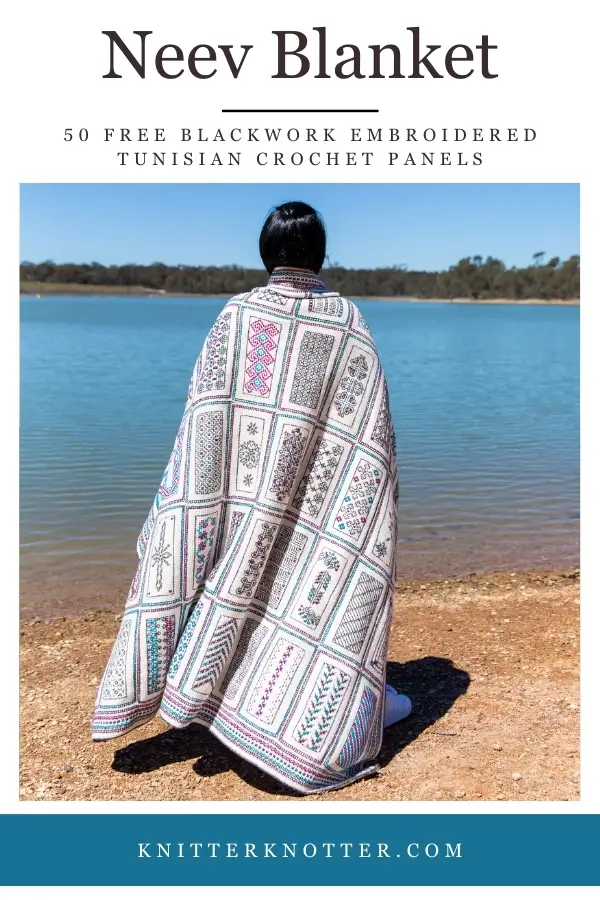
For my blanket, I made 50 panels, each featuring a unique Blackwork design framed by a common border to bring them all together. The finished blanket is a beautiful Blackwork sampler that feels both creative and full of history.
I hope you enjoy exploring this technique as much as I did. I can’t wait to see the color combinations and designs you come up with!
Technique and Difficulty
Intermediate – This pattern requires familiarity with starting and ending a Tunisian crochet project, as well as the Tunisian Simple Stitch.
Note: This pattern is beginner-friendly where you’ll only need to know one stitch — the Tunisian Simple Stitch. It is rated intermediate, only because of the intricate embroidery work that follow
CLICK HERE TO PURCHASE THE AD-FREE PATTERN!
What you will need

Yarn
You’ll need yarn in four colors for this project. I recommend choosing something with a cotton base because it creates a firm, dense fabric that’s perfect for embroidery. Since this pattern includes a lot of blackwork-style embroidery, I picked a light-colored base paired with black yarn for the stitching, and added two contrasting colors that stand out against the base and the black. This helps the design really shine. Before starting your final project, it’s a good idea to check that your yarn doesn’t bleed.
For my blanket, I used Scheepjes Stonewashed / Riverwashed yarn in the following colors:
- Moonstone (Stonewashed): 3800 yd / 3480 m / 47 oz / 1338 g (27 skeins)
- Black Onyx (Stonewashed): 921 yd / 842 m / 11 oz / 324 g (7 skeins)
- Steenbras (Riverwashed): 190 yd / 174 m / 2.4 oz / 67 g (2 skeins)
- Danube (Riverwashed): 174 yd / 159 m / 2.2 oz / 61 g (2 skeins)
The yardage mentioned here is for the entire blanket as shown in the picture. I recommend getting one extra skein of the base color yarn (Moonstone) for the practice square or gauge swatch.
Note: As of this pattern’s release (December 2025), the Riverwashed series has been discontinued. A good alternative is Scheepjes Catona, which works well for this project. You’ll need similar quantities of yarn, even though it’s listed under a different weight category. Feel free to reach out if you have any questions.
Hook
For my blanket, I used a 4.5 mm (size 7) Tunisian crochet hook. To add the finishing touches to the blanket, I used a 3.25 mm (D-3) crochet hook.
Note: This project does NOT require a double-ended hook. The border is worked flat and will need a long cord that can accommodate about 300 stitches at once.
KnitDenise have kindly offered a discount code that you can use to get a 15% discount on all their products: KKCAL26. This code is valid through Dec 1st, 2026.
Purchase the complete Denise Hook Set
(use coupon KKCAL26)
Purchase the complete Denise 2 Hook Set
(use coupon KKCAL26)
Notions
- Embroidery needle – a sturdy needle with a large eye for threading yarn. This will also be used to join the panels and to weave in yarn ends.
- Stitch markers – I highly recommended them to keep track of your embroidery. Detailed instructions on how to use them will be included in the supporting videos.
- Measuring tape
- Scissors
- Thimble (optional) – I recommend this because even with a blunt needle, the amount of embroidery in this pattern can be tough on your fingers.
- Disappearing ink pen (optional) – To trace the pattern or for marking stitches in complex embroidery sections.
- Reading light (optional) – While it is not required, I highly recommend using a focused reading light if you’re working with dark yarn.
Sizing
The final size of your blanket will vary depending on the yarn you select. The following measurements are based on the gauge mentioned in this pattern:
- Panels: 10” x 5.5” (25.5 cm × 14 cm)
- Border: 3” (7.75 cm) wide
- Blanket: 56” x 61” (142 cm × 155 cm)
Colors
This pattern uses a total of four colors: one for the base fabric and three for the embroidery. All panels are crocheted using the base fabric color only. I’ve referred to the Blackwork color as BC and the Fabric color as FC in this pattern.
FC: Moonstone (Stonewashed)
BC: Black Onyx (Stonewashed)
C1: Steenbras (Riverwashed)
C2: Danube (Riverwashed)
Support Videos
All support videos for this CAL can be found on my YouTube channel – Click here for the dedicated playlist.
Gauge
19 rows of 22 Tunisian Simple Stitches make a 4″ (10 cm) square (not embroidered).
I’ve noticed that embroidery can slightly change the size of the fabric, depending on how tight your stitches are, so it’s important to keep your embroidery nice and loose.
Gauge is not crucial for this pattern; what matters more is creating a fabric that you like. Choose a hook that matches your selected yarn and make your final panels with that combination. Your blanket may end up smaller or larger than mine, but it’s more important to have the right fabric, in my opinion.
Note: You don’t need a separate gauge swatch—you can use your practice swatch to check gauge. More details are provided below. Keep in mind that the yarn used for this swatch isn’t included in the pattern’s total yardage.
Abbreviations and Stitches
- ch – chain
- fs – First Stitch – Skip the first vertical bar of the previous row (the one right under the one on the hook). The loop on the hook will count as the first stitch for every row.
- ls – Last Stitch – Pick up the two vertical bars of the last stitch of the previous row, yarn over, pull through both the vertical bars into a loop on the hook.
- sc – Single Crochet – Insert hook into the next stitch, yarn over, pull up a loop on the hook, yarn over and pull through both loops on the hook.
- scblo – Single Crochet in the back loop only – Insert hook into the next back loop of the next stitch, yarn over, pull up a loop on the hook, yarn over and pull through both loops on the hook.
- tss – Tunisian Simple Stitch– Insert hook in the vertical bar, yarn over, pull up a loop on the hook.
- yo – yarn over
- FR – Foundation Row
- BOR – Bind off Row
CLICK HERE TO PURCHASE THE AD-FREE PATTERN!
Stitches
Left Handed Tutorial

Right Handed Tutorial

I used Running, Double Running, and Cross Stitches for all of my designs, so you don’t need to know any other embroidery stitches for this pattern. In the videos, I also show how to make a Back Stitch — it’s a handy option if you’d rather not use double running stitches for straight lines. If you’re not familiar with any of these stitches, please rever to the video tutorial above.
CLICK HERE TO PURCHASE THE AD-FREE PATTERN!
General Information
- This is a beginner-friendly Tunisian crochet pattern, but some of the embroidery designs can be a little tricky. If you’re not following the embroidery guide, try breaking the designs into smaller parts and see what you can make with a simple running stitch.
- The blanket has 50 panels, but you can make more or fewer depending on the size you want. Of the 50 panels, some feature repeating patterns while others are non-repeating. I’ve mixed them up to keep things interesting—some are inspired by Indian art, others are abstract designs I created, and a few are simple repeating patterns.
- You can even combine two panels to make a square—this opens up lots of creative possibilities! You don’t have to make a blanket, and I’d love to see what you come up with if you make something different.
- I strongly recommend blocking your panels twice: once before you start the embroidery so the stitches are easier to see, and again after all the embroidery is done to relax the fabric and make joining the panels much easier.
- For panels with heavier embroidery, it’s perfectly fine if they stretch a bit. This just happens to make room for all the extra yarn in the stitches.
- If you’re an experienced crocheter, you can use a stabilizer. I didn’t use one myself, but if you know what it is and how to use it, feel free to include it.
Pattern notes
- This pattern is written in US Terms.
- The written instructions cover only the Tunisian crochet panels. All embroidery instructions are provided in chart form only.
- Every panel is worked flat.
- The panels are made with one color only which is FC (Fabric Color).
- The panels are made with 1 stitch only – Tunisian Simple Stitch
- The written instructions are only for the forward pass. The return pass for every row is the same:
ch1, (yo, pull through two loops)* until one loop remains on the hook. - There is no return pass for the bind off row (BOR).
Tips
- After finishing a section of embroidery, check it visually. This makes it easier to see the pattern and catch any mistakes early.
- Keep your embroidery stitches relaxed, but not too loose—yarn hanging off the fabric can catch on things. Relaxed stitches also help prevent the fabric from distorting once the embroidery is complete.
- Use embroidery yarn that is the same weight as your base yarn or lighter—not heavier, as heavier yarn will cause more distortion in the base fabric.
CLICK HERE TO PURCHASE THE AD-FREE PATTERN!
Charts and Practice Swatch
- Each square in the grid represents one Tunisian Simple stitch.
- Follow the written instructions to create the base fabric for your panels; the charts are only meant to show the embroidery.
- Edge stitches are not included in the chart, so the number of squares in the chart is two less than the total number of stitches in each panel.

Embroidery guides:
The embroidery guides are created assuming you are using the Running Stitch. Each guide provides a step-by-step method for creating the embroidery on a panel. I’m not an expert at embroidery, so please use the guides as a reference rather than a strict rule. Each guide shows one version of how I embroidered the designs — the approach I found works best — but if you prefer a different method, feel free to use that instead.
A few things to know when reading the guides:
- The outer and inner frames are not included in the guides for individual panels. It is assumed that the frames are already in place before you begin following the guide for each panel.
- Repeated motifs in a panel are indicated separately — read the charts for motifs from left to right, top to bottom.
- Red lines and blocks indicate what to make next:lines usually represent Running Stitch or Double Running Stitch, and blocks indicate Cross Stitch
- Red lines and blocks only show what to do next and NOT the color to use. Please refer to the next chart in the guide to see which color to work with.
- Black lines and any other non-red lines indicate what has already been completed.
- If there’s an arrow, it marks the recommended starting point. I suggest starting there to follow the sequence of stitches as shown in the chart. If there’s no arrow, feel free to start anywhere.
Embroidery guides for the border:
The embroidery guides for the border panels are a bit different from the rest. Since these panels are quite large and have a repeating pattern, only the beginning and end sections are shown in the charts. You’ll see grey lines between them — these just mean you should keep repeating the pattern across the entire panel.
The design for the border panels is meant to be calm and meditative. I wanted something simple that didn’t need a lot of memorizing — just easy, relaxing stitching. You’ll find zigzag lines and squares that are worked using the double running stitch. The nice thing is that this pattern is very forgiving, so if you make a small mistake, it’ll still look great.
- For the top and bottom panels, there are three charts on each page — read them from top to bottom, just like the other panels in the blanket.
- For the left and right panels, there are two charts per page. Use the left one first, then the right one, before moving on to the next page.
Instructions
Row 1 (FR): This is the Foundation Row.
With FC, chain 23, make the foundation row stitches in the back loops of the chain.
Rows 2 – 21: fs, 21 tss, ls.
BOR: fs, 21 tss, ls.
This will be the bind off row. You will make a slip stitch every time you pick up a loop on your hook. Fasten off and weave in ends.
Note: The video tutorial doesn’t follow this embroidery guide exactly. As I mentioned earlier, there are many ways to create the same design. The embroidery guide shows one method that worked well for me, but it’s not the only one. In the video, I used a slightly different approach — so feel free to follow whichever makes the most sense to you. The charts are just guides to help you along the way.
CLICK HERE TO PURCHASE THE AD-FREE PATTERN!
Pin this for later!

Disclosure
This page may contain affiliate links where I earn a small commission. While using these links doesn’t cost you more, it helps me continue to offer patterns for free. Thank you for your continued support!
I strive to offer my patterns for free and that is possible only with your support. Please share this post and your pictures as much as possible. Every share counts 🙂
SUBSCRIBE TO OUR FREE NEWSLETTER
You will receive alerts for new patterns and sneak peeks of my future patterns. I also share deals with my subscribers that you won’t get elsewhere!! Want more free crochet patterns? Join my newsletter for updates, new designs, and seasonal round-ups.


Thank you for sharing your talent.
Thank you, going to try this CAL