Ansh Blanket – Tunisian Crochet Sampler
The Ansh Blanket is a Tunisian crochet sampler designed with one main goal in mind — to help you learn the basics of Tunisian crochet one square at a time. Each square introduces a new stitch or technique, and they are arranged in order of complexity, starting with beginner level stitches and gradually working towards more advanced beginner techniques by the end. It’s a really enjoyable way to build your skills without feeling overwhelmed!
Whether you’re picking up a Tunisian crochet hook for the very first time or have dabbled a little and want to build more confidence, the Ansh Blanket is a wonderful project to have on your hook. By the time you’ve worked through all the squares, you’ll have a solid foundation in Tunisian crochet — and a beautiful blanket to show for it!
The pattern for each square is available for free right here on my blog. Scroll down for all the links and get started whenever you’re ready!
This blanket pattern was originally hosted as a CAL in 2020.
The CAL-specific information has since been removed from this page,
leaving just the free pattern for easy reference and readability.

Disclaimer: this post may contain affiliate links – please see the affiliate disclosure for details.
If you’re looking for color and yarn inspiration, the KnitterKnotter Facebook group is a great place to start! So many people have shared their completed hexagons and blankets there — head to the albums and you’ll find an amazing variety of colors and yarns to spark your creativity. It’s such a great resource!
Pattern
This pattern consists of 25 squares plus a bonus square from a guest designer — all available for free right here on the blog. Scroll down for the links to each square!
If you’d prefer to have the pattern in PDF format, I have two options available. The Beginner Bundle includes the first 16 squares, while the Beginner + Intermediate Bundle gives you all 25 squares designed by me in a single, easy-to-follow PDF. Choose whichever works best for you!
Purchase the Ebook
Beginner Bundle with 16 squares
Beginner + Intermediate bundle with 25 squares
All Squares (Click on the links to jump to instructions)
- Tunisian Simple Stitch
- Tunisian Full Stitch
- Tunisian Purl Stitch
- Tunisian Knit Stitch
- Tunisian Reverse Stitch
- Tunisian Honeycomb Stitch
- Tunisian Rib Stitch
- Tunisian Top Stitch
- Tunisian X Stitch
- Mori Lace Pattern
- Tunisian Double Crochet Stitch
- Tunisian Yarn Over Stitch
- Tunisian Cables
- Tunisian Bobble
- Tunisian Extended Stitches
- Tunisian Moss Stitch
- Border
- C2C Entrelac
- Color change
- Mitered Squares
- Log cabin Square
- Tunisian in the round (TITR)
- Tunisian Pinwheel
- Tunisian Textured Waves
- Asparagus Stitch by Andrea Crețu
- Cross Stitch on Tunisian Crochet
- 10 Stitch Square
Technique and Difficulty
16 Squares – Beginner
9 Squares – Intermediate
Size
45” x 45” (114 cm x 114 cm) – this is adjustable with each block measuring 8″ x 8″ (20 cm x 20 cm).
Abbreviations
- ch – chain
- 5dcbob – 5 Double Crochet Bobble – *Insert hook into the intended stitch knit-wise, yarn over and pull up a loop on the hook, yarn over, pull through two loops on hook; repeat from * 4 more times, yarn over, pull through 5 loops, chain 1.
- dec – Decrease – Insert hook into the vertical bars of the next two stitches , yarn over, pull up a loop through both the vertical bars.
- extls – Extended Last Stitch – Pick up the two vertical bars of the last stitch of the previous row, yarn over, pull through both the vertical bars into a loop on the hook, chain 1.
- exttfs – Extended Tunisian Full Stitch – Insert hook into the next space between two stitches, yarn over, pull up a loop on the hook, chain 1.
- exttks – Extended Tunisian Knit Stitch – Insert hook in the space between the two vertical bars of the next stitch, pull up a loop on the hook, chain 1.
- exttps – Extended Tunisian Purl Stitch – Bring yarn forward, insert hook into the vertical bar, yarn over, pull up a loop on the hook, chain 1.
- exttrs – Extended Tunisian Reverse Stitch – Insert hook in the back vertical bar, yarn over, pull up a loop through the vertical bar, chain 1.
- exttss – Extended Tunisian Simple Stitch – Insert hook into the vertical bar, yarn over, pull up a loop on the hook, chain 1.
- fs – First Stitch – Skip the first vertical bar of the previous row (the one right under the one on the hook). The loop on the hook will count as the first stitch for every row.
- tdc – Tunisian Double Crochet Stitch – Yarn over, insert hook into the next vertical bar, yarn over, pull up a loop on the hook, yarn over, pull through two loops on the hook.
- tfs – Tunisian Full Stitch– Insert hook into the next space between two stitches, yarn over, pull up a loop on the hook.
- tks – Tunisian Knit Stitch – Insert hook in the space between the two vertical bars of the next stitch, pull up a loop on the hook.
- tps – Tunisian Purl Stitch – Bring yarn forward, insert hook into the vertical bar, yarn over, pull up a loop on the hook.
- tribs – Tunisian Rib Stitch – tss in next stitch, twtss in next stitch.
- trs – Tunisian Reverse Stitch – Insert hook in the back vertical bar, yarn over, pull up a loop through the vertical bar.
- tss – Tunisian Simple Stitch– Insert hook in the vertical bar, yarn over, pull up a loop on the hook.
- ttops – Tunisian Top Stitch – Insert hook in the back horizontal bar of the next stitch, yarn over, pull up a loop on the hook.
- twtss – Tunisian Twisted Stitch – Insert hook in the next vertical bar in the opposite direction with the hook facing upwards.
- txs – Tunisian X Stitch – Skip next vertical bar, tss in next stitch, tss in the skipped stitch.
- ls – Last Stitch – Pick up the two vertical bars of the last stitch of the previous row, yarn over, pull through both the vertical bars into a loop on the hook.
- yo – yarn over
What you will need (with clickable affiliate links)
Yarn
Worsted Weight / Medium weight yarn – Approximately 1 oz / 30 gm / 70 yards / 65 m per square. You can use any number of colors to make this blanket. I am used Lion Brand Heartland yarn in the colors: Olympic, Yosemite, Yellowstone, Joshua Green and Sequoia.
Hook
An 8 mm Tunisian Crochet Hook – If you do not have a Tunisian crochet hook, it is possible to use a regular hook that is not ergonomic – all you need is a hook that can hold about 25 stitches at once.
If you need some help with figuring out which hook to buy, I have reviewed all the hooks I have used so far. You are welcome to take a look before making the final decision.
Notions
Scissors, Tapestry needle, and Measuring tape
Instructions
Tunisian Simple Stitch

This square is made with the Tunisian Simple Stitch.
Resources
Pattern Notes
The number of loops on the hook at the end of the forward pass of any row is the same as number of stitches in the foundation row.
Instructions
Foundation Row
FP: Chain 25. Make the foundation row stitches in the back loops of the chain.
RP: ch1, (yo, pull through two loops)* all the way till the end of the row.
Rows 1 – 19
FP: fs, 23 tss, ls
RP: ch1, (yo, pull through two loops)* all the way till the end of the row.
Row 20
FP: fs, 23 tss, ls.
This will be the bind off row. This is the same as the previous row except that you will make a slip stitch every time you pick up a loop on your hook. Refer to the Resources section for a tutorial.
RP: There is no return pass for this row.
Tunisian Full Stitch

This square is made with the Tunisian Full Stitch.
Resources
Pattern Notes
- Please count your stitches – since there is an inherent bias in this stitch because of how it is made, it is easy to miss / add a stitch.
- The number of loops on the hook at the end of the forward pass of any row is the same as number of stitches in the foundation row.
- You can expect to see a LOT of curling. Here is how my square looked before and after blocking (For some reason my camera / phone doesn’t capture the blue very well. The second picture doesn’t show the true color of the yarn):


Instructions
Foundation Row
FP: Chain 23. Make the foundation row stitches in the back loops of the chain.
RP: ch1, (yo, pull through two loops)* all the way till the end of the row.
Row 1
FP: fs, 21 tfs, skip the space between the last two stitches, ls
RP: ch1, (yo, pull through two loops)* all the way till the end of the row.
Row 2
FP: fs, skip the space between the first two stitches, 21 tfs, ls
RP: ch1, (yo, pull through two loops)* all the way till the end of the row.
Rows 3 – 26: Repeat Rows 1 and 2.
Row 27
FP: Repeat Row 1.
Tunisian Purl Stitch

This square is made with the Tunisian Purl Stitch.
Resources
Pattern Notes
The number of loops on the hook at the end of the forward pass of any row is the same as number of stitches in the foundation row.
Instructions
Foundation Row
FP: Chain 25. Make the foundation row stitches in the back loops of the chain.
RP: ch1, (yo, pull through two loops)* all the way till the end of the row.
Rows 1 – 22
FP: fs, 23 tps, ls
RP: ch1, (yo, pull through two loops)* all the way till the end of the row.
Row 23
FP: fs, 23 tps, ls.
This will be the bind off row. This is the same as the previous row except that you will make a slip stitch every time you pick up a loop on your hook. Refer to the Resources section for a tutorial.
RP: There is no return pass for this row.
Tunisian Knit Stitch

This square is made with the Tunisian Knit Stitch.
Resources
Pattern Notes
- The number of loops on the hook at the end of the forward pass of any row is the same as number of stitches in the foundation row.
- You can expect to see a LOT of curling.
Instructions
Foundation Row
FP: Chain 25. Make the foundation row stitches in the back loops of the chain.
RP: ch1, (yo, pull through two loops)* all the way till the end of the row.
Rows 1 – 26
FP: fs, 23 tks, ls
RP: ch1, (yo, pull through two loops)* all the way till the end of the row.
Row 27
FP: fs, 23 tks, ls.
This will be the bind off row. This is the same as the previous row except that you will make a slip stitch every time you pick up a loop on your hook. Refer to the Resources section for a tutorial.
RP: There is no return pass for this row.
Tunisian Reverse Stitch

This square is made with the Tunisian Reverse Stitch.
Resources
Instructions
Foundation Row
FP: Chain 25. Make the foundation row stitches in the back loops of the chain.
RP: ch1, (yo, pull through two loops)* all the way till the end of the row.
Rows 1 – 23
FP: fs, 23 trs, ls
RP: ch1, (yo, pull through two loops)* all the way till the end of the row.
Row 24
FP: fs, 23 trs, ls.
This will be the bind off row. This is the same as the previous row except that you will make a slip stitch every time you pick up a loop on your hook. Refer to the Resources section for a tutorial.
RP: There is no return pass for this row.
Tunisian Honeycomb Stitch

This square is made with the Tunisian Honeycomb Stitch.
Resources
- How to make the Foundation Row
- Tunisian Simple Stitch
- Tunisian Purl Stitch
- Tunisian Honeycomb Stitch
- How to Bind Off
Instructions
Foundation Row
FP: Chain 25. Make the foundation row stitches in the back loops of the chain.
RP: ch1, (yo, pull through two loops)* all the way till the end of the row.
Row 1
FP: fs, (tss, tps) * repeat until the end of the row, ls.
RP: ch1, (yo, pull through two loops)* all the way till the end of the row.
Row 2
FP: fs, (tps, tss) * repeat until the end of the row, ls.
RP: ch1, (yo, pull through two loops)* all the way till the end of the row.
Rows 3 – 22
Repeat Rows 1 and 2.
Row 23
FP: Repeat Row 1.
This will be the bind off row. You will make a slip stitch every time you pick up a loop on your hook. Refer to the Resources section for a tutorial.
RP: There is no return pass for this row.
Tunisian Rib Stitch

This square is made with the Tunisian Rib Stitch.
Resources
- How to make the Foundation Row
- Tunisian Rib Stitch and Tunisian Twisted Stitch
- Tunisian Simple Stitch
- How to Bind Off
Pattern Notes
- This stitch is a combination of the Tunisian Simple Stitch and the Tunisian Twisted Stitch.
- You need to start with an even number of stitches in your foundation row.
Instructions
Foundation Row
FP: Chain 26. Make the foundation row stitches in the back loops of the chain.
RP: ch1, (yo, pull through two loops)* all the way till the end of the row.
Rows 1 – 21
FP: fs, tribs * 12 times, ls.
RP: ch1, (yo, pull through two loops)* all the way till the end of the row.
Row 22
FP: Repeat Row 1.
This will be the bind off row. This is the same as the previous row except that you will make a slip stitch every time you pick up a loop on your hook. Refer to the Resources section for a tutorial.
RP: There is no return pass for this row.
Tunisian Top Stitch

This square is made with the Tunisian Top Stitch.
Resources
Pattern Notes
- When starting to make a row, it is slightly hard to find the first back horizontal bar. You might have to stretch the fabric a bit to find it.
- There might be a slight bias in the fabric towards one side. That is normal and can be fixed by blocking. It does not make a big difference in a square of this size but it is something to be kept in mind for larger projects.
- I did not make a bind off row for this square. I couldn’t find a good way to bind off and the square did not look unfinished to me even without a bind off row. You are welcome to bind off if you’d like.
Instructions
Foundation Row
FP: Chain 25. Make the foundation row stitches in the back loops of the chain.
RP: ch1, (yo, pull through two loops)* all the way till the end of the row.
Rows 1 – 19
FP: fs, ttops * 23 times, ls.
RP: ch1, (yo, pull through two loops)* all the way till the end of the row.
There is no bind off row.
Tunisian X Stitch

This square is made with the Tunisian X Stitch.
Resources
Pattern Notes
- You need to start with an even number of stitches in your foundation row.
- This pattern is written for the X stitches to line up on top of one another. You can stagger the X stitches by starting and ending with a tss on alternate rows. That will also create a beautiful pattern.
Instructions
Foundation Row
FP: Chain 26. Make the foundation row stitches in the back loops of the chain.
RP: ch1, (yo, pull through two loops)* all the way till the end of the row.
Rows 1 – 26
FP: fs, txs * 12 times, ls.
RP: ch1, (yo, pull through two loops)* all the way till the end of the row.
Row 27
FP: Repeat Row 1.
This will be the bind off row. This is the same as the previous row except that you will make a slip stitch every time you pick up a loop on your hook. Refer to the Resources section for a tutorial.
RP: There is no return pass for this row.
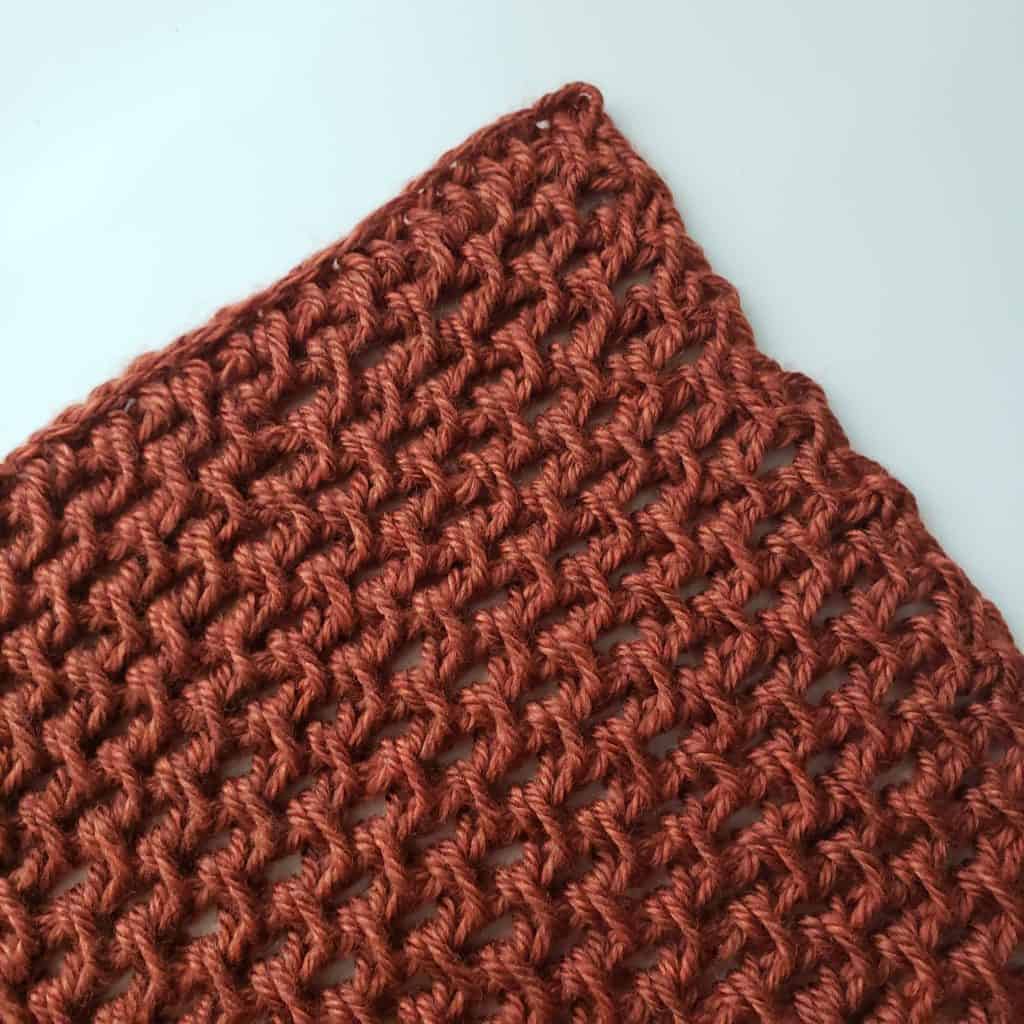
Mori Lace (Arrowhead Lace)

This square is made with the Mori / Arrowhead Lace Pattern.
Resources
- How to make the Foundation Row
- Tunisian Simple Stitch
- Tunisian Full Stitch
- Forward Pass Decrease
- How to make the Mori Lace Pattern
Pattern Notes
- You need to start with an even number of stitches in your foundation row.
- Repeats in the pattern are mentioned in brackets (…). The number of times you must repeat everything between the brackets is mentioned right after.
- There are 2 versions of this pattern – one with the spaces lined up on top of each other and the other with the spaces staggered. Written instructions for both versions are given below.
- Visit the Mori Lace Pattern for (left and right handed) video tutorials for both versions.
Version 1 – With the spaces lined up on top of each other
Foundation Row
FP: Chain 24. Make the foundation row stitches in the back loops of the chain.
RP: ch1, (yo, pull through two loops)* all the way till the end of the row.
Row 1
FP: fs, (dec, yo) * repeat until 1 stitch before the ls, ls
RP: ch1, (yo, pull through two loops)* all the way till the end of the row.
Row 2
FP: fs, (tss, tfs in ch sp) * repeat until 1 stitch before the ls, ls
RP: ch1, (yo, pull through two loops)* all the way till the end of the row.
Rows 5 – 22
Repeat Rows 1 and 2
Row 23
FP: fs, 22 tss, ls.
This will be the bind off row. You will make a slip stitch every time you pick up a loop on your hook. Refer to the Resources section for a tutorial.
RP: There is no return pass for this row.
Version 2 – With the staggered spaces
Foundation Row
FP: Chain 24. Make the foundation row stitches in the back loops of the chain.
RP: ch1, (yo, pull through two loops)* all the way till the end of the row.
Row 1
FP: fs, (dec, yo) * repeat until 1 stitch before the ls, ls
RP: ch1, (yo, pull through two loops)* all the way till the end of the row.
Row 2
FP: fs, (tss, tfs in ch sp) * repeat until 1 stitch before the ls, ls
RP: ch1, (yo, pull through two loops)* all the way till the end of the row.
Row 3
FP: fs, tss, (dec, yo) * until 2 stitches before the ls, tss, ls
RP: ch1, (yo, pull through two loops)* all the way till the end of the row.
Row 4
FP: fs, tss, (tss, tfs in ch sp) * repeat until 2 stitches before the ls, tss, ls
RP: ch1, (yo, pull through two loops)* all the way till the end of the row.
Rows 5 – 22
Repeat Rows 1 – 4
Row 23
FP: fs, 22 tss, ls.
This will be the bind off row. You will make a slip stitch every time you pick up a loop on your hook. Refer to the Resources section for a tutorial.
RP: There is no return pass for this row.
Tunisian Double Stitch

This square is made with the Tunisian Double Crochet Stitch.
Resources
Pattern Notes
- Your foundation row will be different than what you have been making so far. This is because of the height of the stitch.
- The number of stitches in the foundation row will be one less than the number of chain stitches in the beginning chain.
Instructions
Foundation Row
FP: Chain 23. Make the foundation row stitches in the back loops of the chain. See video tutorial to see how to make the foundation row for this stitch.
RP: ch1, (yo, pull through two loops)* all the way till the end of the row.
Rows 1 – 8
FP: ch1 (counts as the first stitch), 20 tdc, els
RP: ch1, (yo, pull through two loops)* all the way till the end of the row.
Row 9
FP: ch1 (counts as the first stitch), 20 tdc, els.
This will be the bind off row. You will make a slip stitch every time you pick up a loop on your hook. Refer to the Resources section for a tutorial.
RP: There is no return pass for this row.
Tunisian Yarn Over Stitch

This square is made with the Tunisian Yarn Over Stitch.
Resources (with video tutorials)
Pattern Notes
- You can find my stitch guide with all the abbreviations here.
- Repeats in the pattern are mentioned in brackets (…). The number of times you must repeat everything between the brackets is mentioned right after.
- The instructions below are only for the forward pass. The return pass for every row is the same.
- ch1, (yo, pull through two loops)* all the way till the end of the row.
Version 1 – With the yarn overs lined up on top of each other
Foundation Row: Make a foundation row with 26 stitches.
Row 1: fs, (yo, tss, tss, and pull yo over the two tss stitches) * repeat until 1 stitch before the ls, ls
Rows 2 – 19: Repeat Row 2.
Row 20 (Bind off Row): fs, tss in every stitch until 1 stitch before the ls, ls
Version 2 – With the staggered yarn overs
Foundation Row : Make a foundation row with 26 stitches.
Row 1: fs, (yo, tss, tss, and pull yo over the two tss stitches) * repeat until 1 stitch before the ls, ls
Row 2: fs, tss, (yo, tss, tss, and pull yo over the two tss stitches) * repeat until 2 stitches before the ls, tss, ls
Rows 3 – 19: Repeat rows 2 and 3.
Row 20 (Bind off Row): fs, tss in every stitch until 1 stitch before the ls, ls
Tunisian Cables

This square of the Ansh Blanket is made using Tunisian Cables – two 2×2 cables on the sides and one 3×3 cable in the center.
Resources (with video tutorials)
- How to make the Foundation Row
- Tunisian Knit Stitch
- Tunisian Purl Stitch
- Tunisian Cables (3×3)
- Tunisian Cables (2×2) – older tutorial
- How to bind off
Pattern Notes
- You can find my stitch guide with all the abbreviations here.
- Special stitches:
- twist4: skip 2 sts, tks in the next 2 sts, tks in the 2 skipped sts
- twist6: skip 3 sts, tks in the next 3 sts, tks in the 3 skipped sts
- The instructions below are only for the forward pass. The return pass for every row is the same.
- ch1, (yo, pull through two loops)* all the way till the end of the row.
Written Instructions
Foundation Row : Make a foundation row with 28 stitches.
Rows 1 -6: fs, 3 tps, 4 tks, 3 tps, 6 tks, 3 tps, 4 tks, 3 tps, ls
Row 7: fs, 3 tps, twist4, 3 tps, 6 tks, 3
Rows 8 – 12: Repeat Row 1
Row 13: fs, 3 tps, 4 tks, 3 tps, twist6, 3 tps, 4 tks, 3 tps, ls
Rows 14 – 18: Repeat Row 1
Row 19: Repeat Row 7
Rows 20 – 25: Repeat Row 1
Row 26 (Bind off Row): Repeat Row 1
Tunisian Bobbles

This square is made with the Tunisian Bobble Stitch.
Resources (with video tutorials)
Pattern Notes
- You can find my stitch guide with all the abbreviations here.
- I have made my square using the 5 DC bobble but you are free to make the HDC bobble if you’d like.
- The instructions below are only for the forward pass. The return pass for every row is the same.
- ch1, (yo, pull through two loops)* all the way till the end of the row.
Written Instructions
Foundation Row : Make a foundation row with 23 stitches.
Row 1: fs, 21 tss, ls
Row 2: fs, 4 tss, 5dcbob, 5 tss, 5dcbob, 5 tss, 5dcbob, 4 tss, ls
Row 3: Repeat Row 1
Tunisian Extended Stitch

This square is made with Tunisian Extended Stitches.
Resources (with video tutorials)
- Tunisian Simple Stitch
- Tunisian Knit Stitch
- Tunisian Purl Stitch
- Tunisian Full Stitch
- Tunisian Reverse Stitch
- Tunisian Extended Stitches
- How to Bind off
Pattern Notes
- You can find my stitch guide with all the abbreviations here.
- I have made my square using the Extended Simple Stitch but you are free to make yours using any stitch you like.
- Your foundation row will be different than what you have been making so far. This is because of the height of the stitch.
- The number of stitches in the foundation row will be one less than the number of chain stitches in the beginning chain.
- The instructions below are only for the forward pass. The return pass for every row is the same.
- ch1, (yo, pull through two loops)* all the way till the end of the row.
Written Instructions
Foundation Row
FP: Chain 23. Make the foundation row stitches in the back loops of the chain. See video tutorial to see how to make the foundation row for this stitch.
RP: ch1, (yo, pull through two loops)* all the way till the end of the row.
Rows 1 – 12
FP: ch1 (counts as the first stitch), 20 exttss, els.
RP: ch1, (yo, pull through two loops)* all the way till the end of the row.
Row 13
FP: ch1 (counts as the first stitch), 20 exttss, els.
This will be the bind off row. You will make a slip stitch every time you pick up a loop on your hook. Refer to the Resources section for a tutorial.
RP: There is no return pass for this row.
Tunisian Moss Stitch
This square is made with the Tunisian Moss Stitch.
Resources (with video tutorials)
Pattern Notes
- You can find my stitch guide with all the abbreviations here.
- The instructions below are only for the forward pass. The return pass for every row is the same.
- ch1, (yo, pull through two loops)* all the way till the end of the row.
Instructions
Foundation Row
FP: Chain 23. You will need odd number of stitches in your Foundation Row.
Make the foundation row stitches in the back loops of the chain.
Row 1
FP: fs, *ks in next stitch, yo, skip one stitch; repeat from * until two stitches remain, ks, ls
Row 2
FP: fs, *yo, tfs in next ch sp; repeat from * until two stitches remain, yo, ls
Row 3
FP: fs, *tfs in next ch sp, yo; repeat from * until two stitches remain, tfs in next ch sp, ls
Rows 4-20
Repeat Rows 2 and 3
Row 21
FP: fs, *tks, tfs in next ch sp; repeat from * until two stitches remain, tks, ls
Row 22
FP: fs, 21 tks, ls
This will be the bind off row. You will make a slip stitch every time you pick up a loop on your hook. Refer to the Resources section for a tutorial.
Joining and Border
Joining squares: Since the squares are all of the same size but the number of edge stitches on them are different, I joined my squares using the Flat Braid join method. It is a lacy join and doesn’t require the same number of edge stitches on all squares.
Border: I decided to go with the Crochet Chain Border to make the border for my blanket. Since it is also made up of chains and single crochet stitches only, it works great with the Flat Braid join.
You will have to switch to a regular crochet hook to make the join and border. I recommend using the hook size that’s mentioned on the label for your yarn. I used a 6 mm hook to join my squares and make the border.
C2C Entrelac Square

This square is made using the C2C Entrelac technique.
Resources (with video tutorials)
- How to make the Foundation Row
- Tunisian Simple Stitch
- Join As You Go technique for joining panels
- How to Bind off
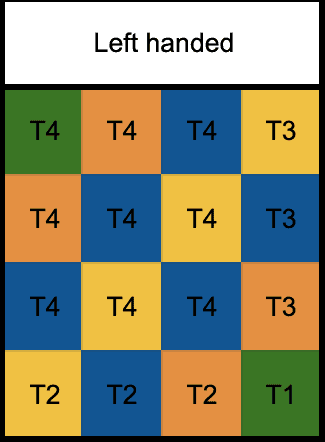
How To Read The Pattern Chart And Make The Square
- I strongly recommend making this square with more than one color.
- The instructions are significantly different for Right and Left handed people so please be careful about picking the right tutorials, charts, and instructions when you make your square.
- The types of squares are mentioned as T1, T2, T3 and T4. The instructions for each square type are mentioned in the C2C Entrelac tutorial.
- I strongly recommend viewing the C2C entrelac tutorial videos before attempting this square. The photo tutorial is for right handed people but I have video tutorials for both left and right handed people.
- Left handed – Start at the bottom right corner and work your way up in diagonals (making squares of 6 rows of 7 Simple Stitches) until you reach the top left corner.
- Right handed – Start at the bottom left corner and work your way up in diagonals (making squares of 6 rows of 7 Simple Stitches) until you reach the top right corner.

Color Changes

In this square, we explore the color change technique.
Resources (with video tutorials)
- How to make the Foundation Row
- Tunisian Simple Stitch
- How to Bind off
- How to change color in Tunisian crochet
Pattern Notes
- Make this square with at least 2 colors otherwise it will end up being a square of Tunisian Simple Stitches.
- There are two kinds of color changes in this square: a) at the beginning of a forward pass, b) in the middle of the row – I strongly recommend viewing the tutorial video for changing color in Tunisian crochet before attempting this square.
- This square is made up of 25 stitches and 22 rows using Tunisian Simple Stitches. This square can be made using the given chart or by following the written instructions.
Written Instructions
- The instructions below are only for the forward pass. The return pass for every row is the same.
- ch1, (yo, pull through two loops)* all the way till the end of the row.
- Colors:
- C1: Joshua Green
- C2: Yosemite
- C3: Olympic
- C4: Yellowstone
Foundation Row
FP: With C1, chain 25. Make the foundation row stitches in the back loops of the chain.
Rows 1 and 2: With C1, 10 tss, change color, with C2, 15 tss.
Rows 3 and 4: With C3, 15 tss, change color, with C4, 10 tss.
Rows 5 and 6: With C2, 10 tss, change color, with C1, 15 tss.
Rows 7 and 8: With C4, 15 tss, change color, with C3, 10 tss.
Rows 9 to 16: Repeat Rows 1 to 8.
Rows 17 to 20: Repeat Rows 1 to 4.
Row 21: With C4, 25 tss.
Row 22: With C4, 25 tss.
This will be the bind off row. You will make a slip stitch every time you pick up a loop on your hook. Refer to the Resources section for a tutorial.
Pattern Chart

Mitered Square

This is the Mitered Square in the Ansh Tunisian Sampler Blanket.
Resources (with video tutorials)
- How to make the Foundation Row
- Tunisian Simple Stitch
- How to make the Top Stitch
- How to Bind off
- How to change color in Tunisian crochet
- How to make Mitered Squares in Tunisian crochet
Pattern Notes
- I did not make a border around my square like the tutorial but you are welcome to make it if you’d like.
- The pattern is very simple for both methods:
- Increase method – we make Simple Stitches on top of every stitch from the previous row. The increases happen in the way of making Full Stitches before and after the stitch in the middle. We make a Top Stitch on top of every middle stitch from the previous row.
- Decrease method – we make
Simple Stitches on top of every stitch from the previous row except for the stitch in the middle where we make a
Top Stitch. The important thing to know in this method is that we do a three stitch decrease (the 3 middle stitches) while working the reverse pass for each row.
Written Instructions (increase method)
Notes
- I strongly recommend viewing the video tutorial for this square before you start making your square.
- The forward pass instructions for each row are the same:
- fs, tss until one stitch before the middle stitch (stitch marked with the stitch marker), tfs, ttops in the stitch marked with the stitch marker, tfs, tss until the last / edge stitch, ls
- The return pass for every row is the same.
- ch1, (yo, pull through two loops)* all the way till the end of the row.
- With every row we add 2 stitches so the number of loops in the forward pass of every row will be 2 more than the previous row.
- Every row will have equal number of stitches on the left and right side of the middle stitch.
- There will be odd number of stitches on every row.
- Tip: Don’t stop counting!! It is very easy to skip / add a stitch in this square. I have learnt it the hard way 🙂
- Colors:
- C1: Olympic
- C2: Yellowstone
- C3: Yosemite
- C4: Joshua Green
Instructions
Foundation Row
FP: With C1, chain 3. Make the foundation row stitches in the chain. Add a stitch marker to 2nd stitch. This stitch marker will be moved up after every row.
Rows 1 – 4: Make with C1
Rows 5 – 10: Make with C2
Rows 11 – 16: Make with C3
Rows 17 – 22: Make with C4
Row 23: Make with C4
This will be the bind off row. You will make a slip stitch every time you pick up a loop on your hook. Refer to the Resources section for a tutorial.
Written Instructions (decrease method)
Notes
- I strongly recommend viewing the video tutorial for this square before you start making your square.
- The forward pass instructions for each row are the same:
- fs, tss until one stitch before the middle stitch (the decrease from the previous row and the one that’s marked with a stitch marker), ttops in the stitch marked with the stitch marker, tss until the last / edge stitch, ls
- The return pass for every row is the same.
- ch1, (yo, pull through two loops)* until you reach the middle 3 stitches, yo, pull through 4 loops (this is a three stitch decrease), (yo, pull through two loops)* all the way till the end of the row.
- With every row we decrease 2 stitches so the number of loops in the forward pass of every row will be 2 less than the previous row.
- Every row will have equal number of stitches on the left and right side of the middle stitch.
- There will be odd number of stitches on every row.
- Tip: Don’t stop counting!! It is very easy to skip / add a stitch in this square. I have learnt it the hard way 🙂
- Colors:
- C1: Olympic
- C2: Yellowstone
- C3: Yosemite
- C4: Joshua Green
Instructions
Foundation Row
FP: With C1, chain 47. Make the foundation row stitches in back loops the chain. Add a stitch marker to middle stitch (the 24th stitch). This stitch marker will be moved up after every row. Make the return pass as mentioned in the Notes section.
Rows 1 – 4: Make with C4
Rows 5 – 10: Make with C3
Rows 11 – 16: Make with C2
Rows 17 – 22: Make with C1
Row 23:
FP: fs, ttops, ls.
RP: yo, pull through all three loops (The return pass for this row is different, there will be no chain in the beginning).
Log Cabin Square

This is the Log Cabin Patterned Square in the Ansh Tunisian Sampler Blanket.
Resources (with video tutorials)
- How to make the Foundation Row
- Tunisian Simple Stitch
- How to Bind off
- How to make a log cabin pattern
Pattern Notes
- I made my square using the first version but you are welcome to choose whichever you like.
- I will not mention color changes in the instructions for this block. You are welcome to change color as you like.
- I strongly recommend viewing the video tutorial for this technique before making the block.
- The tutorial post for this pattern also has a photo visual for your reference.
Written Instructions
Note: The Return pass is the same for all rows – (yo, pull through two loops)* all the way till the end of the row.
Version 1 – stitches made in the same direction
Center Square:
Foundation Row: ch 8, make the foundation row stitches in the back loops of the chain.
Rows 1 – 7: fs, 6 tss, ls
Row 8: fs, 6 tss, ls -> This is the bind off row.
Strip 1: With the right side facing you, turn the project upside down (180 degrees) and attach a new color.
Foundation Row: ch 8, make the foundation row stitches in the back loops of the chain, join with the center square using the join-as-you-go method.
Rows 1 – 7: fs, 7 tss, join with the center square using the join-as-you-go method
Strip 2: Do not turn the project and do not bind off. Attach a new color.
Rows 1 – 8: fs, 14 tss, ls
Row 9: fs, 14 tss, ls -> This is the bind off row.
Strip 3: With the right side facing you, turn the project upside down (180 degrees) and attach a new color.
Foundation Row: ch 8, make the foundation row stitches in the back loops of the chain, join with the previous strip using the join-as-you-go method.
Rows 1 – 15: fs, 7 tss, join with the previous strip and the center square using the join-as-you-go method
Strip 4: Do not turn the project and do not bind off. Attach a new color.
Rows 1 – 8: fs, 22 tss, ls
Row 9: fs, 22 tss, ls -> This is the bind off row.
Version 2 – stitches made perpendicular to the previous strip
Center Square:
Foundation Row: ch 8, make the foundation row stitches in the back loops of the chain.
Rows 1 – 7: fs, 7 tss, ls
Row 8: fs, 7 tss, ls -> This is the bind off row.
Strip 1: With the right side facing you, turn the project by 90 degrees and attach a new color.
Row 1: Make 8 stitches evenly along the side of the center square (8 loops on the hook at the end of the forward pass)
Rows 2 – 8: fs, 7 tss, ls -> The last row will be a bind off row.
Strip 2: With the right side facing you, turn the project by 90 degrees and attach a new color.
Row 1: Make 16 stitches evenly along the side (16 loops on the hook at the end of the forward pass)
Rows 2 – 8: fs, 14 tss, ls -> The last row will be a bind off row.
Strip 3: With the right side facing you, turn the project by 90 degrees and attach a new color.
Row 1: Make 16 stitches evenly along the side (16 loops on the hook at the end of the forward pass)
Rows 2 – 8: fs, 14 tss, ls -> The last row will be a bind off row.
Strip 4: With the right side facing you, turn the project by 90 degrees and attach a new color.
Row 1: Make 24 stitches evenly along the side (24 loops on the hook at the end of the forward pass)
Rows 2 – 8: fs, 22 tss, ls -> The last row will be a bind off row.
Tunisian-In-The-Round Square

This week we will make a square using the Tunisian in the Round (TITR) technique in the Extended version of the Tunisian Sampler Blanket. If you’re new to this technique, I also have a beginner course that covers all the basics and will get you up to speed in no time!
Resources (with video tutorials)
- Tunisian Simple Stitch
- Tunisian Reverse Stitch
- Tunisian Knit Stitch
- Tunisian Full Stitch
- How to Bind off
- How to make a square using the TITR technique
Pattern Notes
- I strongly recommend viewing the video tutorial for this technique before making the square.
- Colors:
MC: Yellowstone
C1: Joshua Green
C2: Yosemite
C3: Olympic - The forward pass is worked in the main color (MC) only.
- This square requires a double ended hook.
Written Instructions
Foundation round
Using MC, make 8 single crochet stitches in a magic ring, join with the first single crochet using a slip stitch. The loop on the hook counts as the first stitch of the next round.
Round 1
FP: tss, *yo, tss in next sc, yo, tss in next sc; repeat from * 2 times, yo, tss in next sc, yo
RP: Move all loops on the hook to the other end. Turn the project, join C1, (yo, pull through 2 loops on hook) across until 3 loops remains on hook. Move all the remaining loops to the other end and turn the project again – the right side of the project will be facing you now.
Round 2
FP: *tss, tfs, tks in ch sp, tss, tks in ch sp, tfs; repeat from * 3 times
RP: After every repeat, move all loops on the hook to the other end and turn the project. With C1, (yo, pull through 2 loops on hook) across until a few loops remains on hook. Move all the remaining hooks to the other end and turn the project again – the right side of the project will be facing you now.
Round 3
FP: *tss, tfs, 5 tss, tfs; repeat from * 3 times
RP: Same as RP of Round 2
Round 4
FP: *tss, tfs, 7 trs, tfs; repeat from * 3 times
RP: Same as RP of Round 2
Round 5
FP: *tss, tfs, 9 tss, tfs; repeat from * 3 times
RP: Same as RP of Round 2 but use color C2
Round 6
FP: *tss, tfs, 11 tss, tfs; repeat from * 3 times
RP: Same as RP of Round 5
Round 7
FP: *tss, tfs, 13 trs, tfs; repeat from * 3 times
RP: Same as RP of Round 5
Round 8
FP: *tss, tfs, 15 tss, tfs; repeat from * 3 times
RP: Same as RP of Round 2 but use Color C3
Round 9
FP: *tss, tfs, 17 tss, tfs; repeat from * 3 times
RP: Same as RP of Round 8
Round 10
FP: *tss, tfs, 19 trs, tfs; repeat from * 3 times
RP: Same as RP of Round 8
Round 11
FP: *tss, tfs, 21 tss, tfs; repeat from * 3 times – this is the bind off row.
This is the same as the previous round except that you will make a slip stitch (or a single crochet stitch depending on the bind off method you choose) every time you pick up a loop on your hook.
RP: There is no RP. Cut yarn and weave in ends.
Pinwheel Square

Resources
- How to make the Foundation Row
- Tunisian Simple Stitch
- How to make a pinwheel square using Tunisian crochet
Pattern Notes
I don’t have any written instructions for this square. I have included some pattern charts but the only way to make this square independently is to go through the video tutorials. I have included instructions to make this square in four different patterns – the construction of the square is the same, the patterns are created by changing color at different times.
Tunisian Crochet Waves

This is the Textured Wave Square in the Ansh Tunisian Sampler Blanket.
Resources (with video tutorials)
- How to make the Foundation Row
- Tunisian Simple Stitch
- Tunisian Reverse Stitch
- Tunisian Double Crochet Stitch
- How to change color
- How to bind off
- How to make a wave pattern using Tunisian crochet
Colors
C1: Joshua Green
C2: Yosemite
C3: Olympic
C4: Yellowstone
Instructions
Note:
1. The return pass for every row is the same – ch1, (yo, pull through two loops)* all the way till the end of the row.
2. If you have trouble with making the reverse stitches – trs and trdcs, you can make these stitches in the front vertical bars instead. You won’t get the texture that comes from reverse stitches but you will get the waves right.
Foundation Row [C4]: Chain 26 (multiples of 6 + 2 stitches). Make the foundation row stitches in the back loops of the chain.
Row 1 [C2]: fs, *3 trs, 3 trdcs; repeat from * until the end of the row, extls
Row 2 [C4]: fs, tss across, ls
Row 3 [C3]: ch 1, *3 trdcs, 3 trs; repeat from * until the end of the row, ls
Row 4 [C4]: fs, tss across, ls
Row 5 [C1]: Repeat Row 1
Row 6 [C4]: Repeat Row 2
Row 7 [C2]: Repeat Row 3
Row 8 [C4]: Repeat Row 4
Row 9 [C1]: Repeat Row 1
Row 10 [C4]: Repeat Row 2
Row 11 [C3]: Repeat Row 3
Row 12 [C4]: Repeat Row 4
Row 13 [C2]: Repeat Row 1
Row 14 [C4]: Repeat Row 2
Row 15 [C4]: fs, 24 trs across, ls (Bind off). This row is the same as other rows except that you will make a slip stitch every time you pick up a loop on your hook. There will be no reverse pass for this row.
Asparagus Stitch by Andrea Cretu

This square is a special bonus and is not part of the official Ansh Blanket pattern. It was designed by Andrea Crețu, who generously offered it as a free pattern during the 2020 CAL. Andrea came up with this unique stitch combination and calls it the Asparagus Stitch Square. She has created both left and right handed video tutorials to walk you through making it!
Resources (with video tutorials)
- How to make the Foundation Row
- Tunisian Simple Stitch
- Tunisian Purl Stitch
- How to bind off
- How to make the Asparagus Stitch
Instructions
You can find all the instructions to make this square on Andrea’s blog here.
Embroidery on Tunisian Crochet

In this square, first create a Tunisian Simple Stitch square and then cross stitch a pattern over it.
Resources (with video tutorials)
- How to make the Foundation Row
- Tunisian Simple Stitch
- How to bind off
- How to cross stitch on Tunisian crochet
Colors:
Rows 1, 20, and 21 – Olympic
Rows 2, 19 – Joshua Green
Rows 3 to 18 – Yellowstone
Cross Stitch – Yosemite
Instructions
Foundation Row
FP: Chain 26. Make the foundation row stitches in the back loops of the chain.
RP: ch1, (yo, pull through two loops)* all the way till the end of the row.
Rows 1 – 20
FP: fs, 24 tss, ls
RP: ch1, (yo, pull through two loops)* all the way till the end of the row.
Row 21
FP: fs, 24 tss, ls.
This will be the bind off row. This is the same as the previous row except that you will make a slip stitch every time you pick up a loop on your hook. Refer to the Resources section for a tutorial.
RP: There is no return pass for this row.
When the fabric is complete, cross stitch the design over it.
Note: The numbers mentioned in the chart are row numbers and column numbers. This is different from the video where I have mentioned stitch numbers instead of column numbers.
10 Stitch Square

This square uses the 10 stitch technique. There are no written instructions for this one — please refer to the video tutorial for guidance. The only adjustment I made was using 9 stitches instead of 10 to match the size of the other squares. Everything else remains the same as shown in the video.
Resources (with video tutorials)
- How to make the Foundation Row
- Tunisian Simple Stitch
- How to bind off
- How to make a 10 stitch square
Pattern
This pattern consists of 25 squares plus a bonus square from a guest designer — all available for free right here on the blog. Scroll down for the links to each square!
If you’d prefer to have the pattern in PDF format, I have two options available. The Beginner Bundle includes the first 16 squares, while the Beginner + Intermediate Bundle gives you all 25 squares designed by me in a single, easy-to-follow PDF. Choose whichever works best for you!
Purchase the Ebook
Beginner Bundle with 16 squares
Beginner + Intermediate bundle with 25 squares
Share your pictures with me!
I really hope you liked this pattern. I would love to see your version of this design so please share your pictures with me!
– Share them on Instagram with the tags #knitterknotter, #madewithknitterknotter, and @knitterknotter
– Share them in my Facebook Group
– Create a project on Ravelry
I strive to offer my patterns for free and that is possible only with your support. Please share this pattern and your pictures as much as possible. Every share counts 🙂
Copyright and Terms of Use
This pattern is for personal use only. You are welcome to make and sell handmade items using this pattern but you are required to credit the design to Arunima Goel @ KnitterKnotter by linking back to https://knitterknotter.com. Do not publish or sell this pattern, in part or in full and do not make any video tutorials of this pattern without my permission. When featuring KnitterKnotter in pattern roundups, blog articles or Facebook posts, you may use one of my photos and provide a link back to the original source.
Disclosure
This page may contain affiliate links where I earn a small commission. While using these links doesn’t cost you more, it helps me continue to offer patterns for free. Thank you for your continued support!
SUBSCRIBE TO OUR FREE NEWSLETTER
You will receive alerts for new patterns and sneak peeks of my future patterns. I also share deals with my subscribers that you won’t get elsewhere!!